
BY SHELBY MAYES
Nowadays, a brand new pair of shorts is so expensive! So today, we’re going to give

PHOTO COURTESY OF GOOGLE This is a how to DIY shirt.
you an alternate idea.
Target has a pair of girls’ denim shorts on sale for $9.99. This DIY is a great way to create a pair of shorts into the style you want. So for this DIY, you are going to need bleach, water, something to mix the two in, a sprayer bottle, paint brush, rubber gloves, a bathtub, your pair of shorts that you are going to bleach, and a sponge. This DIY really depends on what you want your jeans to look like in the end. Always remember to express yourself!
So the first step is to head into the bathroom
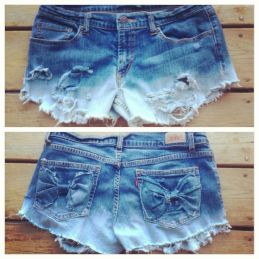
PHOTO COURTESY OF GOOGLE This is a DIY pair of shorts that Marina Barello has created.
and dampen your jean shorts in the bathtub. You are doing this because the bleach will become more apparent if your jean shorts are wet. Make sure to change into old clothes so you don’t ruin any of the clothes you like. After you dampen your jeans, the next step is to start mixing your bleach and water. Mix one part bleach into two parts water. Put your mixture into a spray bottle, or leave it in whatever you mixed it in. When your bleach mixture is ready, put your rubber gloves on, and put some old towels down where you don’t want the bleach to stain. After you have done that, start to spray the bottom half of your jean shorts with the bleach, and use a sponge to press it out and make it even. Try to use downward squirts of bleach so you make an ombre effect. After you have put the bleach on the shorts, within 5 minutes you should start to see a color change. If you see a spot that you missed, go over it with some more bleach.
After you are done bleaching your shorts, let it sit for 10 minutes, or until you start to see the color you want. After you get to that point, wash your jean shorts, and there you have it! You have made your very own, designed by you, jean shorts!
Next up, we have a DIY shirt to go with your new shorts. You will need an old (or new) plain shirt in the color of your choice. Here are the steps to create your own designer shirt. 1) Take your shirt and flatten it out on a table or counter. 2) Take your scissors
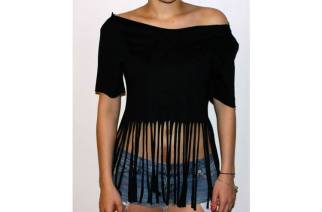
PHOTO COURTESY OF PINTREST This photo is an example of a DIY shirt.
and cut off the neck line of the shirt. Make the neckline as big or as small as you want. (Save this piece of the shirt that you cut off for later.) 3) After you have cut the neckline of your shirt to where you want, cut the seam part off of the bottom as a very small horizontal line. Then, start to fringe the bottom of the shirt like the picture to the right. Start from the bottom and cut upwards in small rows to create the bottom of the shirt. When you are finished with that, you can add a touch of acrylic paint. This can be whatever color you want. You can splatter paint it, or even add sparkles to it!
Last but not least, we have a DIY headband. Remember how I told you to save that piece

PHOTO COURTESY OF PINTEREST This is a photo of a DIY tie back headband that a young lady made out of an old T-Shirt .
of fabric from the shirt? Well, go ahead and pull it back out, because we are going to use it. Take that fabric and either wear it as a normal tie headband, or cut it into three long pieces and braid it into a headband. You can stitch the ends, or even tie them.
Remember to always express yourself, and don’t be afraid to show the real you!
Xoxo, Beauty Obsessed Team:)
